
If you have read my article, “The Secrets to Full Color Screen Printing”, than you already understand the underlying principles to 4 color screen printing. In that article we discussed the principles of the CMYK color model, color separations, halftones, and lines per inch (LPI). In this tutorial, we are going to take what we have learned, and using photoshop, quickly create color separations for output to transparencies for screen printing.
In this tutorial we will be using Adobe Photoshop CS2.
Download the registration marks .psd used in the tutorial, here.
1.) We are going to start off by firing up Adobe Photoshop CS2, and open the registration.psd.
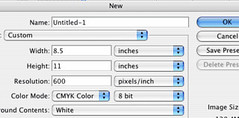
Alternatively, if you would like to start from scratch, create a new file. This file will be 8.5” x 11” at a resolution of 600dpi in the CMYK color mode. Click OK and lets get started.
2.) Next, place the artwork that you plan to use for the final screen print into the registration.psd. File > Place. We are going to want the largest image possible in terms of resolution in order to get the best quality out of our printed piece.

3.) I am choosing a vector image, and while I would have better results going with maybe 5 color spot print, this will work fine for what we are doing. Also, being a vector image, I have the freedom to scale this as large as I like for our final screen.
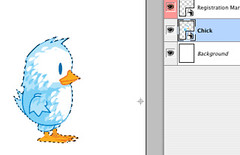
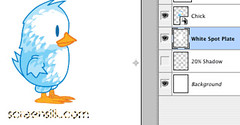
4.) Because I eventually plan to print this onto a colored shirt, I will need to create a white spot plate. I am going to CMD+click (or ctrl+click for PC) on my Chick layer, to create a selection of the artwork, and on a new layer fill that selection with white by pressing CMD+Delete (or ctrl+backspace on a PC).
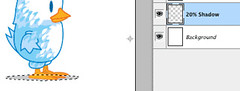
5.) I am also going to create a quick drop shadow for my little chick. Because I want to print this drop shadow right onto the shirt, creating just a dark spot beneath the chick, I do not need to have a white background. So, I will create a new layer under my white spot layer, and with the circle marquee, create a small, horizontal oval. I am going to fill this with 20% black.
6.) I am also going to quickly add some text to my design. Using the text tool, I am going to quickly add screensilk.com in century gothic under my chick. I hit the color box at the top, and using the eyedropper sample the orange from my chick to be used with the text.
7.) Again, because I am going to want this text to be very visible, I am going to have to add it to my white spot plate. Again, I CMD+click (ctrl+click) the text layer to create my selection and after selecting the white spot plate layer, I hit CMD+delete (ctrl+backspace) to fill it with white.
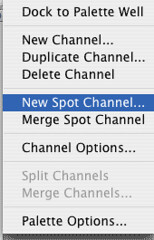
8.) To make this process as easy as possible, lets quickly make our white spot into its own plate. To do this, we are going to , once again, CMD+click our white spot layer. With our outline selected, open the channels palette and from the flyout menu select “New Spot Channel”. Selecting this creates a new channels layer that includes our white spot as a plate. This will be helpful when we start making our separations in the next step.
9.) Save your file.
10.) Let’s start creating our separations. Quickly clicking through our channels palette, we can see how our original artwork is being broken into 5 channels of color. Each channel contains a certain percentage of color to create the colors in the final artwork. Our goal is to break out each separation and convert it to a screen printable halftone.

11.) At the top, select Layer >Flatten Image
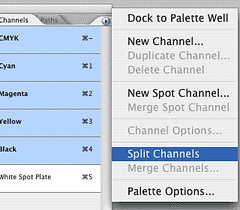
12.) Yikes! I know, I hate doing that too, but looking at our channels palette, you can see that all of our channels are still intact. Open the flyout menu on the channels palette and select Split Channels. This is going to close our flattened file and create 5 individual files of each color separation.
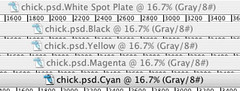
13.) Ok, so now we have our 5 plates. Why 5 you ask? Well because even though we are doing 4 color printing, we do have our white spot plate. If we are only printing to white shirts, we won’t need that plate, but it is easier to create that plate now, than realize a few days later that you want to go to colored fabric and you need to go back and create it. Each file open is named after the original file and has the color name appended to the filename.
14.) Now for the easy part. We are going to convert each of these files to a black and white halftone. From the menu bar, select Image>Mode>Bitmap.
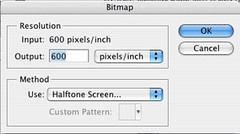
15.) Now we are presented with the bitmap window. Since we are going to output our artwork at the same resolution as we created it, we will put 600 pixels/inch in the output box. For our screening method, we are going to use a halftone, so select Halftone Screen from the drop down box. Click OK
16.) Next we are presented with our halftone screen settings. If you read my previously mentioned article, most of these options should suddenly make a lot of sense to you. The frequency is our LPI. In the article we discussed the means of figuring out your optimal LPI for your screen. For my screen with a mesh count of 220, I figured out I should use an LPI of 63. So in the frequency box, I put 63 lines/inch.
17.) In the article I also discussed halftone angles and their importance for quality prints. Here are the angles I had recommended:
• cyan = 75°
• magenta = 15°
• yellow = 105°
• black = 45°
18.) Because we are creating our Cyan plate, I am going to put 75 into my angle box. For shape, we are going to go with the round halftone.
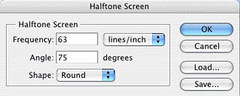
19.) Click Ok, and our plate is converted to a print ready halftone separation.

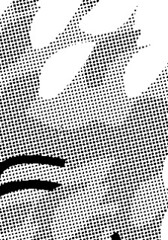
Repeat these steps with the other 3 separations and you will have print ready files ready for output to transparencies or film.
The final print:

Close-up of the final print:

Creating full color screen printed designs can be a rewarding (and profitable) experience. The key to success will be to experiment, and finding the right balance between detail and print-ability.
Please feel free to post your comments about the tutorial, or photos of designs you have created using this tutorial.
If you have found this article useful please feel free to share it at any of the following social bookmarking sites:
Hey I had a quick question what do we do with the white color separation? what is the angle we set it to? & do we change it bitmap like the others?
Really haven’t found such a straight forward tut’ on the CMYK process, good stuff man keep it coming.
thank you for this very informative blog….my god, we have been searching on these steps for more than 2 years and here it is!!!finally thank you thank you,…this will really help our business….
=ika
As a computer freak, aspiring vector artist, and black and white photographer I was wondering about turning some of my work into T-Shirts. I figured it would be a CMYK process, and I thank you for your easy to follow tutorial. I daresay that my darkroom experience is going to come in quite handy in the near future.
Hello, I am a graphic designer in the field of textile printing.
In many cases, we need to print a photograph on textiles.
This picture colors overlap, and there are many colors, how do I separate them so that they are in print, such as photographic image.
Please advise. Please note that I have heard that there is a program to separate the images of more than four colors by image
Just read your article and wondering why you would not just print out of photoshop, choose separations instead of composite, set your angles, lpi, and dot shape, then print your film? I have spent years in pre-press for offset and this is just what I do when I have to generate film for someone printing on a duplicator. Why go through the extra steps?
I got my first two 305 mesh screens in today! I’ll be getting the other two in within the next week. I’ll be using a 110 for the spot plate and Union Ink for my cmyk. I’m printing on a Printa770 and just CAN’T WAIT to start this process! Thanks a ton and I’ll keep you posted on hang-ups and progress. Chat soon!
So, Ive followed all instructions and have the separate channels. Im looking to make a screen print file.
If theyre all bitmap, do I convert >Grayscale >CMYK ?
How would I get them all in one file, into layers in the respective colors so it looks like the photo?
If I take what is bitmapped and color each according to CMYK (ie. %100 Cyan, %100 Magenta etc) and put them into one file as layers, it looks terrible!
Any help would be appreciated
Thanks!
Sean
So the C,M,Y, and K channels are already separated for any image that’s saved in CS2? I’m not familiar with the program and unfortunately can’t avail myself of it on the computer I’m using.
thank you very much for guide
and please tell me that these angels are for any tupe of image or they would be different for each image?
• cyan = 75°
• magenta = 15°
• yellow = 105°
• black = 45°
When it is time to print to your transparency film. Doesn’t the image need to be all black so it exposes properly?
How do you achieve this?
After literally MONTHS of searching around google and the likes, this is the first competent article I’ve found that actually explains the process with regards to screen printing.
Cannot thank you enough for this!
Tom