Have you ever taken a photo on your cell phone, and loved it, but once you had a chance to view it on your computer, or printed it out, you realized it was blurry, pixilated and looked like crap? What if I told you, you could turn that crappy image, into a high res, printable piece of art? This is definitely worth the look….
Here is a quick tutorial of how I converted crap to craft, and created a memorable pieces of art for my family and friends from a cell phone photo.
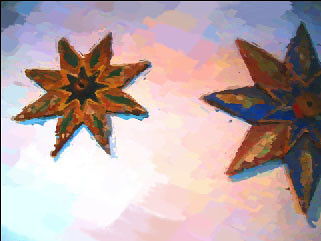
1. Open the cell phone image you want to beautify.
I choose this photo I took inside the Mission in Santa Barbara, CA.
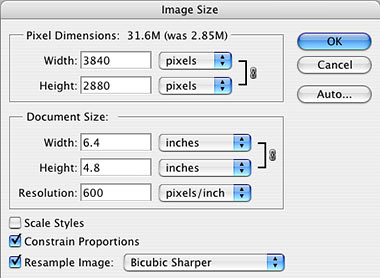
2. Convert Image to high resolution
- Image> Image Size
- Change Resolution to 600
- Constrain Proportions
- Resample Image : Bicubic Sharper
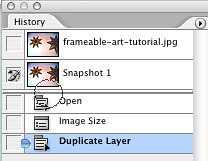
3. Make a copy of the background layer.
This will allow us to always start over if something goes horribly wrong.
4. On the history palette
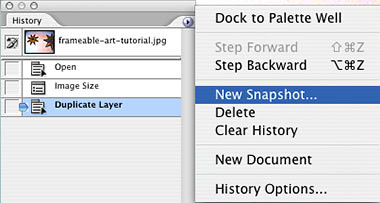
- Open the flyout menu
- Select New Snapshot
- Click the box next to the snapshot
This allows us to paint back the original image no matter how much we change it.
6. Select the Art History Brush
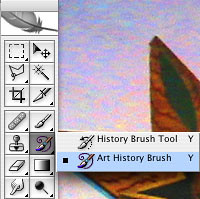
7. Select the Chalk 60 brush

8. On the Brush Settings Bar
- Brush: 1600
- Mode: Normal
- Opacity: 100%
- Style: Tight Long
- Area: 10px
- Tolerance: 0%

9. Using the art history brush
- Begin painting the picture.
- 1600
- 800
- 400
- 200
- 100
- 50
- 25
Starting with the large 1600 brush, fill the canvas with color. Once it full, take the brush size down to half (@800), and begin roughing in your shapes. Continue to decrease the brush size, and focus on the details in the shapes, leaving large areas of color in your white spaces.
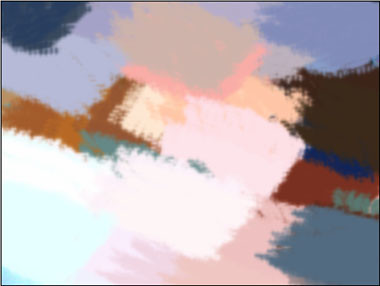
I used the following sizes:
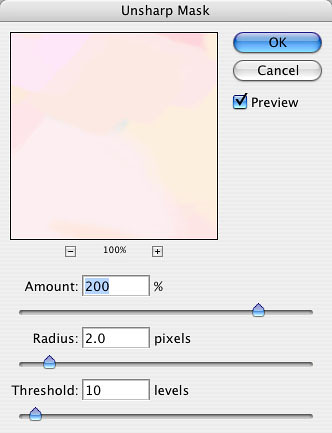
10. Touch up the edges
This will harden the edges of our paint strokes to help add definition to our painting.
- Filter > Sharpen > Unsharp mask
- Amount: 200
- Radius: 2.0
- Threshold: 10
11. That’s it, you’re done! Print and frame.
Ok, I will admit, the only problem with this is the lack of texture to the paint strokes. In order to truly add some depth to our “painting”, lets apply some texture to it.
You may download the paint stroke texture I am using here.
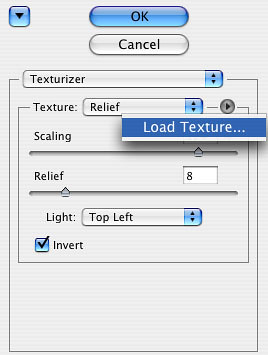
12. Go to Filters > Texture> Texturizer
- Flyout Menu – Load Texture
- Scaling: 174%
- Relief: 8
- Light: Top-Left
- Invert
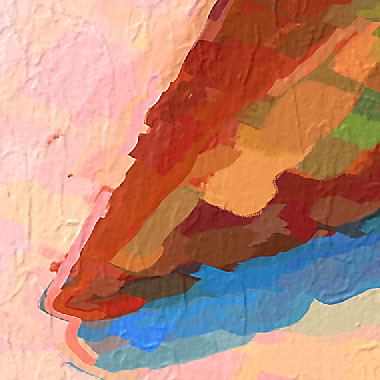
13. You’re Done
Your final print should now have more depth and a more convincing appearance as a painted piece.

Close-up of detail
Print this out as high quality on a nice glossy paper, and mount in a fancy frame. Better yet, using my Full Color Screen Printing in Photoshop Tutorial and can print t-shirts or posters of your painting, that friends and family will cherish for years to come.
If you have found this article useful please feel free to share it at any of the following social bookmarking sites: